Authenticate with oAuth2 and call API using Fiddler

I have a C# MVC web application that uses the OWIN ASP.Net Identity framework in which I've implemented an OAuth 2.0 server.  I'm working on a short proof of concept mobile application where I'd like to authenticate against my web application and call some API's.   I want to keep this as quick and simple as possible for now and manually make the http requests to authenticate and call an API using an access token.

The first step is to make a http request to get back an access token:
POST https://web.app.com/oauth/token HTTP/1.1
User-Agent: Fiddler
content-type: application/x-www-form-urlencoded
Host: web.app.com
Content-Length: 107

client_id=<client id>&client_secret=<client secret>&grant_type=password&username=<username>&password=<password>
The response from that request, if successful, will contain amongst other things and access_token:
{ 
   "access_token":"fwYAnCbseG-Pu-oAMs7nsIbO-v6FmjMHa0VgWQ8YKrmIGcWX5XUQCZ_2OrtZHVUBZVY5ydptAr93YrwxcsBiAdktbJc8P-6cQNPRBhdt3832nKsq5hgJX8fNSsEAPRQcGSb5oyX4EbdhsVgrwdl6aZMVfChmTGCCSgYXK7xkQvAC9heT9k5zkCNPkiE4ob3mE-AL8RILuQFM8bSrSuvgOQByBzyWf-AfMK0EeCOZgfHKur-LqgguQ_ATbCB-rLDG7xWImouJ4ONJ2kmap3X24LECUTUFNhdGtTEtMZtKPZlnhaFVjYvSCQTWNvI_42tUOTz7QEbJDtBgPoG2PrAmtnU1kYJkLPJsZAwSSzue-_Fy9l0rE-RKy5M7z2f_vDedIbMYc186pXDJYZYU7UFR-Seam-itol84Ks0R7dSo990e5QiOcns11Qvqxqrt3GcNKeHE9Fn7zaUgow61LiO7A6Fv9oT17Bv4ShpNve_aLd8qrQg7",
   "token_type":"bearer",
   "expires_in":1199,
   "refresh_token":"7enHr2DzeLvq2v2z-D8G04AfrDn7fmZ25QvFhn100YzlMWJtjvte38wG17KyInKWAxslo_awGKngpVs18bQiUvK2tlD9OhAvxLEU2vpstqdXM2zFRNutOOMx6diD6Y50NecAgPBh18i_dHSv1Fz7xNo0UaMai1UgEwzCUyWNYtLLSLOu9HQkRa3LM90Rgw69LKt8c6JhIqRN6gO_h5SgArWr45XaCdUjU-0OljqLORxOGiRCzn7ckoYRDyqHE5aXKgTr8zGWkBPLlaqOqIEwtCpI3IW55rzEFq5NQiEiOxPhK59ZVxIPQGdmkhwoyjG4VrkocRCRYSUKJqwCixrpWXGEYHfwfItQKz1OwqH112641CSiaLgPInBGQ8OQb9-fYsuqq46J-D9GBb0Tc0fZrJiHkVJjDzxjaDNqct2hCQIr3zqmTuGGwozQFh9BzQGLOoODKpmiZhZJkt2v-JqIOJLHqIFdxpgGJPI6hEpM41W0VqNx",  
   ".issued":"Thu, 11 Feb 2016 10:07:03 GMT",
   ".expires":"Thu, 11 Feb 2016 10:27:03 GMT",
   "http://schemas.xmlsoap.org/ws/2005/05/identity/claims/name":"username",
   "urn:oauth:scope":""
}
Now we have authenticated we can use the access token to make a http request to an API endpoint:
GET https://web.app.com/api/v1/route HTTP/1.1
User-Agent: Fiddler
content-type: application/x-www-form-urlencoded
Host: web.app.com
Content-Length: 0
Authorization: Bearer sSijb61BQZMXLNelOUpf-vpBcP49kXarZ2HeA_zTrkiJ_ouGxypzlYjsnL6rA5Igs-WlHblc6L5Czylgo-_UYfkm0kYxqQKKY0O--HQew8QpskaJrvhzvsN56UHDQ25R2Q0Aorn08ae80nq1Hvrrah7JG1xpq4knUYGime_VXp6K4kqCWiI3qjcAD-ONaFlZPKa3l_qpFVgd2alv-0R9MZ4kJ3UIy3jRYpPaUSfkVkEhRMUtIQQNup7XctYNwavlLBAWEQnd2NK8OTaHkf4FBANPOiJlwc2r8rYTOpBPptlLdPLecwTP50Ll49xwoHbfSyBgJ3UnQMxAiejpTzpIP63CGuon0t75ZhVlf2665n892NXQqaplNQ2TrfNbHOM7gI2-qx7kd2DNUYXBXIQWrOW5NX8-nGuhH9YVqawdL_yEeZ9WbDEgAqED7c4BBvmMitcI4LgCLyaISvJ6D4O1Zxr5rTPAXGXsYbdZZdcFguAmvc7m
In the GET request we need to add an Authorization header with a value of "Bearer " plus the access token. I've written this post as a reminder to myself on how to follow the oAuth flow using Fiddler, there are lots of examples out there on S*#toverflow most of which are rubbish.

FlickR Channel for Plex Media Server

I use FlickR becuase they offer a massive 1TB of space for free, photos from my smartphone are set to automatically sync too.  At home I have a Plex Media Server which mostly serves up video content to a TV with a Chromecast attached to it.  I've also got a WiFi Photo Frame which I wanted to display photos from my FlickR account on.  After some Googling I found that someone had written a FlickR plugin along time ago, but it wasn't working with the latest release of Plex.

So I decided that this was a good oppurtunity to learn some Python and write a new FlickR plug-in for Plex.  FlickR uses OAuth 1.0a to authenticate users against their API, so I found an existing oauth.py file that handled all of the signature complexity.  I quickly discovered that the Plex plug-in's run in a sandbox environment, so I was restricted in which libraries I could import, this made things a bit akward but not impossible.

The Plug-In requires your FlickR username and password, after which it will display a list of your PhotoSet's to choose from.  Here's a screenshot of the Channel:


As I mentioned you'll need to enter your FlickR username and password into the FlickR Channel Settings:


The source code for the Plug-in is available on GitHub here.  Please raise any questions or suggestions on the GitHub page.

To install the plug-in on your Plex Media Server, locate the following folder:

\\<YourServer>\Plex\Library\Application Support\Plex Media Server\Plug-ins

I have a Synology Disk Station where Plex is installed as a Package, so the location might be different depending on which flavour of Plex you have installed.

Create a new sub folder called FlickR.bundle and copy the Contents folder from the GitHub repository into it.  You might need to reboot or restart the Plex server afterwards.

If it doesn't work please have a look for the log in the following folder:

\\<YourServer>\Plex\Library\Application Support\Plex Media Server\Logs\PMS Plugin Logs

There should be a file called com.plexapp.plugins.flickr in which hopefully will be a clue as to the problem.


Raspberry Pi Tempreature Sensor with Scratch

So far I've been using LED's and micro switches in my prototyping, I wanted to take it to the next level and see if I could use an integrated circuit.  I thought this would be a good challenge to take to the Bournemouth Christmas hack day!

I bought some DS18B20 temperature sensors and using the documentation on the pridopia.co.uk website configured my raspberry pi and scratch to read the temperature data.

Using RDP/xrdp to connect to the raspberry pi, I connected using the root logon which you might need to enable.

I needed to run the following commands in the terminal window:
sudo modprobe w1-gpio
sudo modprobe w1-therm

Here's what my breadboard looks like with the temperature sensor.


The pridopia instructions have you setup and run a mesh host which handles reading the data, when you run Scratch you can then join the mesh to get access to the devices.

Here's a screenshot of the scratch program running and displaying the temperature


Will demo this at the next Code Club meeting.

Raspberry Pi Traffic Lights

Materials
  • 1 x Raspberry Pi with Scratch GPIO 5
  • 1 x GPIO Breakout Board
  • 1 x Breadboard (Maplin AD-01 Solderless Breadboard)
  • 3 x LEDs (Green, Amber, Red)
  • 3 x Resistors
  • 7 x Jumper Leads

Introduction

GPIO

GPIO stands for General Purpose Input Output.  Here is a diagram of the layout, some pins have a specific function such as pin 6 which is Ground the equivalent to a negative terminal of a battery.  
We can control all of the Green labelled pins from Scratch, either setting output pins to on or off, or monitoring the state of input pins.  We will use LEDs for output and a micro switch for input.
Pins 3, 5, 7, 8 & 10 are set to be input by default and the rest as output.


http://www.raspberrypi-spy.co.uk/wp-content/uploads/2012/09/Raspberry-Pi-GPIO-Layout-Revision-2.png


Breadboard

The Breadboard is like a circuit board, but it allows us to easily connect the components (LEDs, Resistors and Switches) to the GPIO Header using Jumper Leads.
The rows on the Breadboard are connected.  So if you connect a Jumper Lead to pin V1-A1 then     V1-B1, V1-C1, V1-D1, V1-E1 and V1- F1 will have a connection to that lead too.  

LEDs & Resistors

LED stands for Light Emitting Diode.  A Diode is like a one way street, it’s important to connect the positive and negative the right way around or it won’t work.  
If you look closely at an LED you will notice that it has one leg longer than the other.  The long leg is the positive terminal or connection.
https://blogger.googleusercontent.com/img/b/R29vZ2xl/AVvXsEgKB-oVrjJV4WW4rJ9rlLPdHGnLzTgVTOwP-ZIO03oNzbicSyCLvqn-5fWQm1OFH39OyKNskQGr0bqnTl1cKdkszDpzwVDlCJBiMvjMfhTCriaaZUA_cRjH1x99-_enO-PVfZ_c8WN9ns5q/s1600/infrared-led-382260.jpg
LEDs are designed to work with difference voltages, this will be lower to the output voltage from the GPIO pin.  If we connected the LED directly to the GPIO pin and set the output to on it would blow the LED.  So, we need to use a resistor to adjust the voltage for the LED.  The Resistor needs to be connected between the GPIO pin and the positive or long leg of the LED.

Jumper Wires

Jumper wires are used to connect the components on the breadboard.
They are only needed to connect components across different rows on the breadboard, remember that the columns on a row are already connected on the board.   For example, the long leg of the LED is on the same row as one end of the resistor.  The short leg of the LED needs to be connected to the Ground/Negative pin of the GPIO, so we would use a jumper wire on the same row as the LED’s short leg and connect it to the same row as pin 3 on the GPIO.

Green Light

Take a Jumper Lead and plug it into V1-A6, this is connected to pin 11 on the GPIO.  Connect the other end to V2-A20.
Take a Resistor and plug it into V2-B20 and V2-B19. Remember V2-A20 and V2-B20 are on the same row and therefore are connected.
Take an LED and plug the long leg into V2-C19 and the short leg into V2-C18.
Take a Jumper Lead and plug it into V2-D18 and V1-L3. V1-L3 is Ground or Negative on the GPIO.
Now when we switch the output pin 11 to on, it will send 3.3V to the Resistor which will lower the voltage sent to the LED that is connected to Ground/Negative to complete the circuit.

Code

Once you have assembled your components on the breadboard, ask a Teacher to check that everything is in the right place.  The GPIO pins are connected directly to the CPU of the Raspberry Pi and a short circuit could permanently damage it.
Double click the Scratch GPIO 5 icon on the desktop.  This will load Scratch with the plugins necessary to control the GPIO pins.
Select the Events group and drag and drop a When Clicked function onto the surface.
Select the Control group and Drag and drop a Broadcast function under the When Clicked function.  Set the Broadcast text to “pin11on”.
Click the Green Flag to run the project and see if your green LED lights up.
What happens when you stop your project and run it again?  The LED light will stay on until you set the output pin to off using a Broadcast function with the text “pin11off”.

Challenge 1

See if you can make the Green LED flash.  Hint: Try adding Repeat and Wait functions to your code.

Challenge 2


Ask a Teacher to disconnect the breakout cable from the Raspberry Pi.  Then, see if you can add an amber LED using GPIO pin 12.  Hint: Repeat the instructions from the Green Light, using the same pattern of connections.

Maths homework challenge

On the farm there are 3 types of animal - Pigs, cows and hens. The farmer has 10 animals altogether. How many of each type of animal could he have? (eg. 5 pigs, 3 hens, 2 cows) How many combinations of animals can you find?

Office365 Resource Booking

Introduction

The Resource Booking app allows users to manage a list of resources and to reserve those resources in a weekly calendar view. The app will check to make sure that there are no double bookings.

Besides the default page of the app which provides access to the Resources & Bookings lists, you can add an App Part to any page on the host site to display the calendar and allow users to add and delete reservations. The App Part does not contain links to open the Resource and Resource Bookings lists.

Managing Resources & Bookings

Below is a screen shot of the default app page.

There is a link to the list of Resources where users can manage the names of the available resources.

The Resources list is a simple list that contains only 1 column, which is the title of the resource. If you delete a Resource from the list it won't have any impact on any existing bookings.

There is a link to the list of Resource Bookings where you can manage bookings of resources.

The Resource Bookings list contains columns for the name of the resource, start and end time and owner of the booking. This is just a custom list and won't validate any double bookings, that functionality is only within the booking form described later. It could be useful to create addition custom views of the bookings or easily manage multiple bookings by taking advantage of Sharepoint's out of the box list functionality.

Navigation

By default the app will show the current week. But you can navigate previous and next weeks by click on the arrow buttons. When a user hovers the mouse over a booking a popup will display the name of the booking owner.

Filtering

You can filter the resources that are displayed in the weekly view by checking the Resources in the Resource Filter box at the bottom right.

Create New Bookings

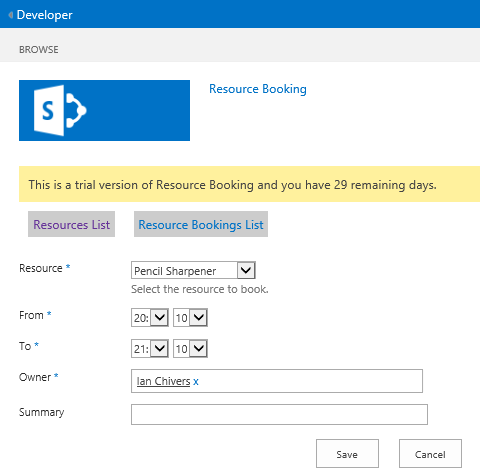
To create a new booking, click on the icon at the right of the day header. You can only create booking reservations that occur in the future, the icon will not appear on days in the past. Please use the Resource Bookings link to access the list if you need to manage bookings from the past.

When you create a new booking the owner field will default to the current user. The start time will default to the nearest 10 minute interval to the current time. Both the start and end times are set to 10 minute intervals.

When you Save a booking a check will be made to ensure there are no clashes with other reservations. If a clash is found the save is cancelled and a message displayed informing you of the name of the person who has already reserved the resource.

Deleting a Booking

To delete a booking click the red cross next to the booking entry. Only the booking owner can delete a reservation from the weekly view and you can only delete bookings that are in the future, the red cross will not appear otherwise. You can use link to the Resource Bookings list to delete any booking if you have the permission todo so.

Using the App Part

Below is a screen shot of an example page where the Resource Booking app part has been added. The only difference is there are no links to open the Resources or Resource Booking lists.

Twilio REST API with Powershell

Twilio empowers developers to build powerful communication. Twilio powers the future of business communications, enabling phones, VoIP, and messaging to be embedded into web, desktop, and mobile software. We take care of the messy telecom hardware and expose a globally available cloud API that developers can interact with to build intelligent & complex communications systems.

Twilio has a truly great communication API, but sadly no Powershell examples on how to use it. So, here is a quick example on how to call the REST API to initiate a phone call.

$password = ConvertTo-SecureString "<AuthKey>" -AsPlainText -Force
$credential = New-Object System.Management.Automation.PSCredential ("<AccountSid>", $password )
$body = "Url=http://your_server/api/twilio&To=<Number>&From=<Number>"
Invoke-RestMethod "https://api.twilio.com/2010-04-01/Accounts/<AccountSid>/Calls.json" -Body $body -Credential $credential -Method "POST" -ContentType "application/x-www-form-urlencoded"