Showing posts with label Sharepoint. Show all posts

Office365 Weather WebPart

A while ago I wrote a Sharepoint web part that displayed a 5 day weather forecast for a user configurable location using Met Office data from the Azure Datamarket. I wanted to try porting this web part to Office365, to see if I could overcome the challenges of working predominantly client side using Javascript.

With the help of jQuery to make ajax requests to the Datamarket and a cryptographic library to encrypt the username and password that is included in the ajax request headers I've managed to accomplish this goal.

One of the major challenges was to overcome the cross site scripting issues, where I was making requests to the Datamarket from the Office365 domain. The Datamarket supports the oData standard well from a .Net Framework perspective, but it requires user interaction to allow the request from a purely web client or javascript approach. Internet Explorer has an object called a XDomainRequest which is specifically designed for cross site data requests, the only problem is that you can't include any headers, which means that authentication was ruled out. Aparently IE 10 will work the same way that Chrome does now and properly support jQuery CORS. So, I had to compromise and change internet explorer's security settings to allow cross site data requests.

I've just published the code in a CodePlex project here: http://o365Weather.codeplex.com

Add a Stylesheet to a Page from a Sharepoint 2010 Sandbox WebPart

I have a module in my project that deploys a style.css document to the site Style Library.  I wanted to add a reference to this Stylesheet from within my WebPart code to the page.  I never anticipated that this would be a problem, even in a sandbox solution and the restrictions that came with it.

I couldn't use the Microsoft.Sharepoint.WebControls.CssRegistration class becuase I was in a sandbox solution.  So I thought let's try using standard .Net methods, like adding to the Page.Headers collection, but in my sandbox WebPart that property was always null.

I couldn't find anyway of adding the Stylesheet reference server side from a WebPart in a sandbox environment.  The only option left was to use client side javascript to dynamically add the reference to the DOM.

Here is a snippet of code from my WebPart that accomplishes this:
protected override void RenderContents(HtmlTextWriter writer)
        {
            StringBuilder js = new StringBuilder();

            js.AppendLine("var added = false");
            js.AppendLine("for (i = 0; (a = document.getElementsByTagName(\"link\")[i]); i++)"); 
            js.AppendLine("{");
            js.AppendLine("  if (a.getAttribute(\"rel\").indexOf(\"style\") != -1");
            js.AppendLine("      && a.getAttribute(\"href\").indexOf(\"kwsresourcebooking365\") != -1)");
            js.AppendLine("  {");
            js.AppendLine("    added = true;");
            js.AppendLine("  }");
            js.AppendLine("}");
            js.AppendLine("if(!added)");
            js.AppendLine("{");
            js.AppendLine("  var head = document.getElementsByTagName(\"head\")[0];");  
            js.AppendLine("  if(document.createStyleSheet)");
            js.AppendLine("  {");
            js.AppendLine("    document.createStyleSheet('" + SPContext.Current.Site.Url + "/style%20library/folder/style.css" + "');");
            js.AppendLine("  } else {");
            js.AppendLine("    var css = document.createElement('link');");
            js.AppendLine("    css.type = 'text/css';");
            js.AppendLine("    css.rel = 'stylesheet';");
            js.AppendLine("    css.href = '" + SPContext.Current.Site.Url + "/style library/folder/style.css" + "';");
            js.AppendLine("    head.appendChild(css);");                        
            js.AppendLine("  }");
            js.AppendLine("}");
           
            base.RenderContents(writer);

            writer.AddAttribute(HtmlTextWriterAttribute.Type, "text/javascript");
            writer.RenderBeginTag(HtmlTextWriterTag.Script);
            writer.WriteLine(js.ToString());
            writer.RenderEndTag();
        }
The Javascript will first check to see if the Stylesheet link exists in the head. If it doesn't exist then it will check to see if the createStyleSheet method is available, which essentially means that we are in Internet Explorer or else manually create link tag. I did consider using the Sharepoint client script manager, but I think there maybe sandbox restrictions there too and I was growing tired of hitting sandbox brick walls. I hope this saves you some time and frustration!

Sharepoint Filtered List Lookup Field

This post explains how to create a filtered lookup field to another list using the Office Sharepoint Designer 2007 client.  This can be done without the need to write any code!

To start with we need to build 2 Lists in a Sharepoint site.  List A will be used as the target of the lookup and the other List B as the source.  Make sure you create some data in List A for our filtered lookup to find.

Open up Office Sharepoint Designer 2007 client and open the Sharepoint Site that contains the Lists.  Expand the Lists in the Folder List window, and then expand List B.  You should see the default files:

AllItems.aspx
NewForm.aspx
EditForm.aspx
DispForm.aspx

In this example we’re going to create a custom NewForm.aspx to put our filtered lookup field in, but you will need to update the EditForm.aspx and DispForm.aspx files as well.

Copy & Paste the NewForm.aspx and rename the pasted file to MyNewForm.aspx.  Edit MyNewForm.aspx and select the ListFormWebPart in the design pane and delete it.  From the Insert drop down menu choose Sharepoint Controls and select Custom List Form:


Select List B from the List to use form for and Edit item form for the type of form to create.

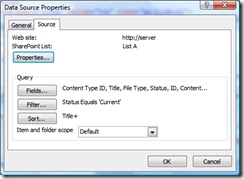
Now we need to setup a new data source for List A.  Select the Data Source Library task pane and expand Sharepoint Lists.  From the drop down options choose Copy & Modify…


Click the Filter button and setup the desired filter rules.  On the General tab give the new Data Source a new name.

Insert the new Data Source control onto the Page.

From the toolbox scroll down to Sharepoint Controls – Data View Controls, drag and drop a new Drop Down List onto the design pane.  Edit it’s Data Fields… and connect it to the Data Source we created earlier.  You need to be careful where you insert the Data Source onto the page or the Drop Down List control won’t be able to see it.

When you have saved the new form, we need to tell Sharepoint to use it in place of the standard new form.  Right click on List B in the Folder List pane and choose Properties.


Goto the Supporting Files tab and set the Content type specific forms to Item and then update the New Item form property.

When you create a new item in List B you should now see your custom form.

Sharepoint Drop Down Context Menu Workflow Shortcut

It’s fairly simple to add custom menu options to the drop down context menu in sharepoint library/list views. One useful example maybe to provide a shortcut to start workflows, instead of opening the workflow page; selecting the desired workflow and clicking the Start button.

To do this we need to add some Javascript to the page. Edit the page and add a Content Editor Web Part, hide it by clearing its Layout / Visible on Page checkbox. Edit the Content Editor Web Part Source and insert the following Javascript:

<script language="javascript">

function Custom_AddDocLibMenuItems(m, ctx)
{
var strDisplayText = "Send for Review";
var strAction = "http://sharepointserver/Workflows/Send%20for%20Review/Send%20for%20Review.aspx?List=14987b66-90be-4693-aafd-94bc6ba8f18e&amp;ID=24&amp;TemplateID={dcbbce95-46dc-4b58-b69e-a99b9ea6a698}&amp;Source=http%3A%2F%2Fsharepoint%2Edomain%2Ecom%2FWIP%2FForms%2FOpen%2Easpx%3FPageView%3DShared";

var strImagePath = "";

var start = strAction.indexOf("&amp;ID=")+4
var prefix = strAction.substr(0, start)
var suffix = strAction.substr(strAction.indexOf("&amp;", start), strAction.length)

strAction = "location.href = '" + prefix + currentItemID + suffix + "'"

// Add our new menu item
CAMOpt(m, strDisplayText, strAction, strImagePath);

// add a separator to the menu
CAMSep(m);

return false;
}
</script>

If you update the workflow you will need to edit the strAction property as the URL will change. Also if you try to start a workflow using the shortcut on an item where the workflow is already running the workflow will error. If there is a way to check if workflow is running on an item I’d be interested to know how it’s done!

Using Sharepoint UserGroup Web Service with InfoPath Forms Service

When you create a data connection to the UserGroup Sharepoint Web Service and select the GetUserCollectionFromGroup method, Infopath doesn’t interpret the results correctly and you can’t use the data connection in a Drop Down List control. I’ve seen examples which use code to get around this problem, but I’m using the Forms Service so code is not an option. We need to modify Infopath’s xsd file of the web service data connection to fix the problem.

In the example below I will create a data connection to the http://moss/_vti_bin/usergroup.asmx web service to receive data to use in a Drop Down List to pick from the members of a Sharepoint Group.

1. Create the Data Connection


2. Select Web Service


3. Enter the URL to the UserGroup web service, don’t forget to include your site in the URL if appropriate.


4. For this example I’m using the GetUserCollectionFromGroup method


5. Provide InfoPath with an example Group Name
6. Provide InfoPath with the actual Group Name you want this Data Connection to query
7. Choose if you want to store a copy of the data in the form template for use in Offline mode. Since I’m using the Forms Service the form will never be used offline, so I’m leaving the box unchecked
8. Give your new Data Connection a name and Finish the wizard


Next we need to save the Form so we can manually edit the XSD for the Data Connection. From the File drop down manu choose Save as Source Files…
Open the folder where you saved the Form and you should see a Developers1.xsd file, edit this file with your favourite XML Editor (or notepad). Update the file so it looks like the snippet below, I’ve put in a comment at the start and end of the modification.

<schema elementformdefault="qualified" targetnamespace="http://schemas.microsoft.com/sharepoint/soap/directory/" xmlns:http="http://schemas.xmlsoap.org/wsdl/http/" xmlns:mime="http://schemas.xmlsoap.org/wsdl/mime/" xmlns:s="http://www.w3.org/2001/XMLSchema" xmlns:soap12="http://schemas.xmlsoap.org/wsdl/soap12/" xmlns:soap="http://schemas.xmlsoap.org/wsdl/soap/" xmlns:soapenc="http://schemas.xmlsoap.org/soap/encoding/" xmlns:tm="http://microsoft.com/wsdl/mime/textMatching/" xmlns:tns="http://schemas.microsoft.com/sharepoint/soap/directory/" xmlns:wsdl="http://schemas.xmlsoap.org/wsdl/">
 <complextype name="GetUserCollectionFromGroupType">
  <sequence>
   <element maxoccurs="1" minoccurs="0" name="Users">
    <complextype>
     <sequence>
      <element maxoccurs="unbounded" name="User">
       <complextype>
        <attribute name="Notes" type="s:string"></attribute>
        <attribute name="Name" type="s:string"></attribute>
        <attribute name="IsSiteAdmin" type="s:string"></attribute>
        <attribute name="Sid" type="s:string"></attribute>
        <attribute name="ID" type="s:string"></attribute>
        <attribute name="LoginName" type="s:string"></attribute>
        <attribute name="Email" type="s:string"></attribute>
        <attribute name="IsDomainGroup" type="s:string"></attribute>
       </complextype>
      </element>
     </sequence>
    </complextype>
   </element>
  </sequence>
 </complextype> 
 <element name="GetUserCollectionFromSite">
  <complextype></complextype>
 </element>
</schema>
We need to change another part of this file, replacing a s:element block.
<!--<s:element name="GetUserCollectionFromGroup">
  <s:complexType>
    <s:sequence>
      <s:element minOccurs="0" maxOccurs="1" name="groupName" type="s:string"></s:element>
    </s:sequence>
  </s:complexType>
</s:element>-->
<!-- Beginning of insert -->
<s:element name="GetUserCollectionFromGroup" type="tns:GetUserCollectionFromGroupType" />
<!-- End of insert -->
Now save the Developers1.xsd file, right click on the Manifest.xsf file and choose Design.

Add a Drop Down List Control and set its Data Source to Developers, you should now be able to select the correct attributes returned from the web service.

You can Save the Form as a standard XSN file, but DO NOT edit the Developers Data Source in InfoPath or you will overwrite the changes made to the Developers1.xsd file.