This post explains how to create a filtered lookup field to another list using the Office Sharepoint Designer 2007 client. This can be done without the need to write any code!
To start with we need to build 2 Lists in a Sharepoint site. List A will be used as the target of the lookup and the other List B as the source. Make sure you create some data in List A for our filtered lookup to find.
Open up Office Sharepoint Designer 2007 client and open the Sharepoint Site that contains the Lists. Expand the Lists in the Folder List window, and then expand List B. You should see the default files:
AllItems.aspx
NewForm.aspx
EditForm.aspx
DispForm.aspx
In this example we’re going to create a custom NewForm.aspx to put our filtered lookup field in, but you will need to update the EditForm.aspx and DispForm.aspx files as well.
Copy & Paste the NewForm.aspx and rename the pasted file to MyNewForm.aspx. Edit MyNewForm.aspx and select the ListFormWebPart in the design pane and delete it. From the Insert drop down menu choose Sharepoint Controls and select Custom List Form:

Select List B from the List to use form for and Edit item form for the type of form to create.
Now we need to setup a new data source for List A. Select the Data Source Library task pane and expand Sharepoint Lists. From the drop down options choose Copy & Modify…
Insert the new Data Source control onto the Page.
From the toolbox scroll down to Sharepoint Controls – Data View Controls, drag and drop a new Drop Down List onto the design pane. Edit it’s Data Fields… and connect it to the Data Source we created earlier. You need to be careful where you insert the Data Source onto the page or the Drop Down List control won’t be able to see it.
When you have saved the new form, we need to tell Sharepoint to use it in place of the standard new form. Right click on List B in the Folder List pane and choose Properties.

Goto the Supporting Files tab and set the Content type specific forms to Item and then update the New Item form property.
When you create a new item in List B you should now see your custom form.
To start with we need to build 2 Lists in a Sharepoint site. List A will be used as the target of the lookup and the other List B as the source. Make sure you create some data in List A for our filtered lookup to find.
Open up Office Sharepoint Designer 2007 client and open the Sharepoint Site that contains the Lists. Expand the Lists in the Folder List window, and then expand List B. You should see the default files:
AllItems.aspx
NewForm.aspx
EditForm.aspx
DispForm.aspx
In this example we’re going to create a custom NewForm.aspx to put our filtered lookup field in, but you will need to update the EditForm.aspx and DispForm.aspx files as well.
Copy & Paste the NewForm.aspx and rename the pasted file to MyNewForm.aspx. Edit MyNewForm.aspx and select the ListFormWebPart in the design pane and delete it. From the Insert drop down menu choose Sharepoint Controls and select Custom List Form:
Select List B from the List to use form for and Edit item form for the type of form to create.
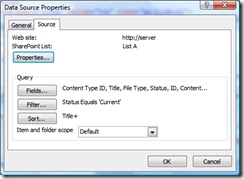
Now we need to setup a new data source for List A. Select the Data Source Library task pane and expand Sharepoint Lists. From the drop down options choose Copy & Modify…
Click the Filter button and setup the desired filter rules. On the General tab give the new Data Source a new name.Insert the new Data Source control onto the Page.
From the toolbox scroll down to Sharepoint Controls – Data View Controls, drag and drop a new Drop Down List onto the design pane. Edit it’s Data Fields… and connect it to the Data Source we created earlier. You need to be careful where you insert the Data Source onto the page or the Drop Down List control won’t be able to see it.
When you have saved the new form, we need to tell Sharepoint to use it in place of the standard new form. Right click on List B in the Folder List pane and choose Properties.

Goto the Supporting Files tab and set the Content type specific forms to Item and then update the New Item form property.
When you create a new item in List B you should now see your custom form.


1 comments:
Innteresting thoughts
Post a Comment